How I Make Images Trainable Again | Data-centric AI, CV
1. Background
We typically take a model-driven approach to solving AI or machine learning problems, but in the real world, we only have requirements and fewer dataset. Therefore, a large part of service-applied AI development involves preparing datasets and making them trainable. In this project, we aim to create a suitable dataset to solve optical characters recognition task in receipt images.
2. Exploratory Data Analysis (EDA)
We focused on understanding the characteristics and shortcomings of the original dataset through EDA. First, we found that it is a multi-lingual receipt dataset, so we searched for similar tasks on Kaggle or Paperswithcode to add the utilized data to our dataset.
Analyzing the average values of the RGB channels in the dataset, we found that each channel has a similar distribution. It means that color information in the image is not very meaningful.
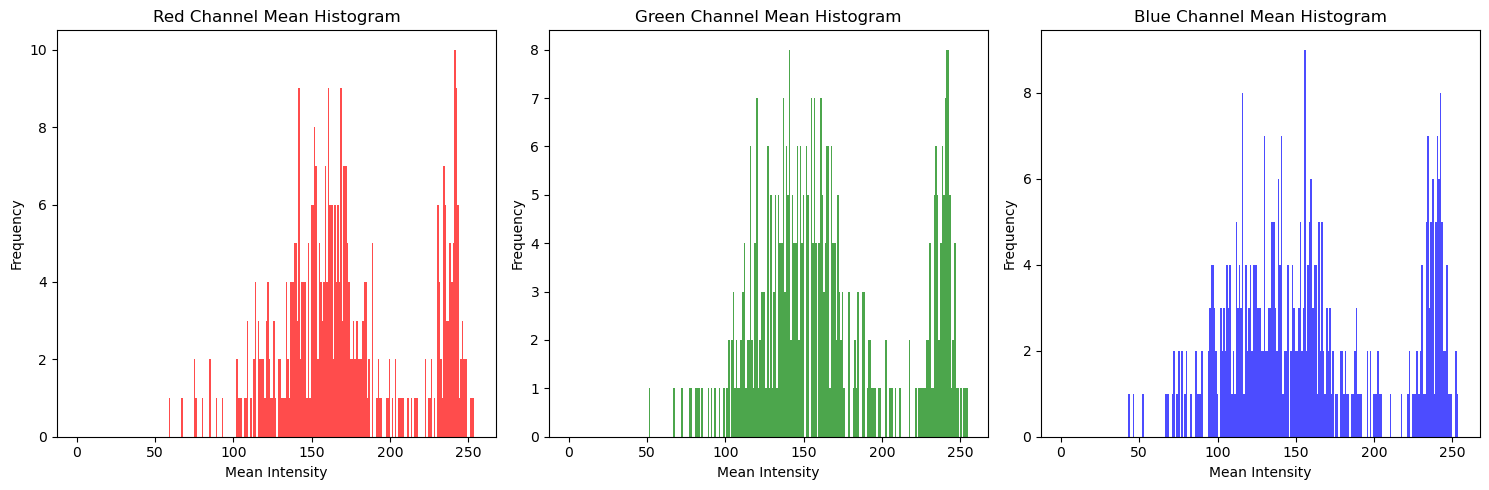 RGB histogram
Visualizing the distribution of center points of the bounding boxes, we found that it is skewed towards certain locations. To diversify the distribution over locations, we applied a technique called mosaic.
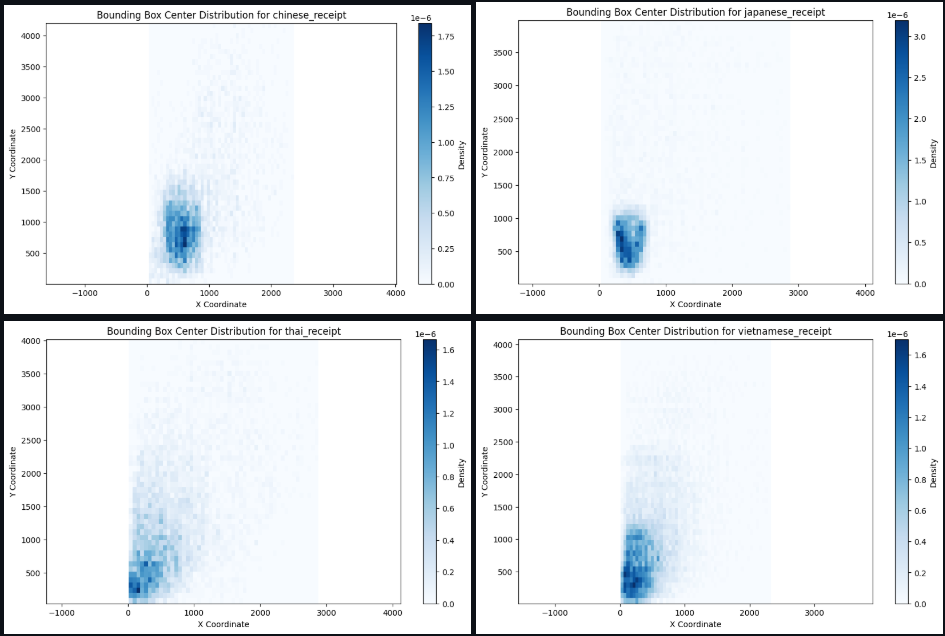 Location of bounding boxes
Looking at the angle of the bounding boxes, most of them are parallel to the x-axis, but some of them are at a twisted angle or outside of the characters. Thus, we re-labeled the annotations to adjust its coordinates.
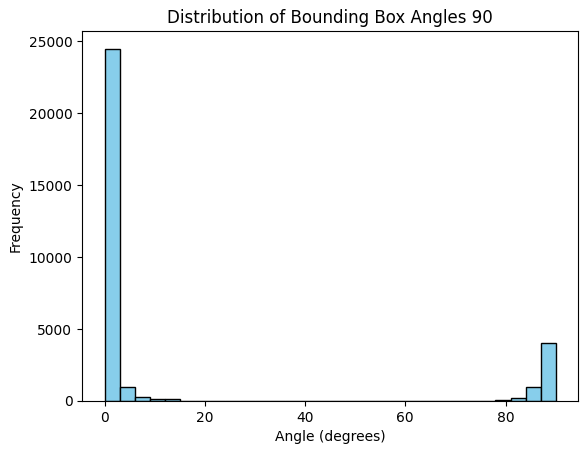 Box Angles
3. Data Augmentation
3.1. Mosaic
Mosaic is an image augmentation technique to merge different images into single image. It can vary the object location and increase the robustness of the model. There are many python libraries to help image augmentation, but we implemented it ourselves as follows.
- Implement a method of PyTorch Dataset Class
- Choose four different images
- Choose center points (xc, yc) between 25% and 75% of the full size randomly
- Extract four images around the center points
- Adjust the bounding boxes of each image to match the position of the mosaic image
- Return the mosaic image and its annotation
The above process can be coded as below.
1
2
3
4
5
6
7
8
9
10
11
12
13
14
15
16
17
18
19
20
21
22
23
24
25
26
27
28
29
30
31
32
33
34
35
36
37
38
39
40
41
42
43
44
45
46
47
48
49
50
51
52
53
54
55
56
57
58
59
60
61
62
63
64
65
66
class CustomDataset(torch.utils.data.Dataset):

  ...

   def load_mosaic(self, index):
        # Size of Mosaic Image
        s = 1024

        indices = [index] + [random.randint(0, len(self.coco.getImgIds())-1) for _ in range(3)]
        final_boxes, final_labels = [], []
        mosaic_img = np.zeros((s, s, 3), dtype=np.float32)
        xc, yc = np.random.randint(s * 0.25, s * 0.75, (2,))

        for i, idx in enumerate(indices):
            image, boxes, labels, _ = self.load_image_info(idx)
            h, w = image.shape[:2]

            if i == 0:  # top-left
                x1a, y1a, x2a, y2a = 0, 0, xc, yc
                x1b, y1b, x2b, y2b = s - xc, s - yc, s, s
            elif i == 1:  # top-right
                x1a, y1a, x2a, y2a = xc, 0, s, yc
                x1b, y1b, x2b, y2b = 0, s - yc, s - xc, s
            elif i == 2:  # bottom-left
                x1a, y1a, x2a, y2a = 0, yc, xc, s
                x1b, y1b, x2b, y2b = s - xc, 0, s, s-yc
            elif i == 3:  # bottom-right
                x1a, y1a, x2a, y2a = xc, yc, s, s
                x1b, y1b, x2b, y2b = 0, 0, s-xc, s-yc

            offset_x, offset_y  = x1a - x1b, y1a - y1b
            boxes[:, 0] += offset_x
            boxes[:, 1] += offset_y
            boxes[:, 2] += offset_x
            boxes[:, 3] += offset_y

            mosaic_img[y1a:y2a, x1a:x2a] = image[y1b:y2b, x1b:x2b]
            final_boxes.append(boxes)
            final_labels.append(labels)

        final_boxes = np.vstack(final_boxes)
        final_boxes[:, 0:] = np.clip(final_boxes[:, 0:], 0, s).astype(np.int32)
        final_labels = np.concatenate(final_labels, axis=0)

        keep = np.where((final_boxes[:, 2] > final_boxes[:, 0]) & (final_boxes[:, 3] > final_boxes[:, 1]))[0]
        final_boxes, final_labels = final_boxes[keep], final_labels[keep]

        target = {
            'boxes': final_boxes,
            'labels': torch.tensor(final_labels, dtype=torch.int64),
            'image_id': torch.tensor([index])
        }

        transform = A.Compose([
            ToTensorV2(p=1.0)
        ], bbox_params={'format': 'pascal_voc', 'label_fields': ['labels']})
        sample = {
            'image' : mosaic_img,
            'bboxes': final_boxes,
            'labels': final_labels
        }
        mosaic_img = transform(**sample)['image']
        target['boxes'] = torch.tensor(sample['bboxes'], dtype=torch.float32)

        return mosaic_img, target, index
Through this code, we can generate the mosaic image. (The below image is not related to this project, but to show how it works)

Mosaic Example
3.2. Image Generation
Creating such a dataset is a necessary step to build a good model, but it can be time-consuming and expensive, so you may want to consider generating your own dataset if necessary. In this case, we thought of image generation to get enough data to train a model at a relatively low cost and time, and we assumed that in the case of OCR, which has a relatively standardized appearance, we could create different shapes of objects in a rule-based way within a framework. To do this, we thought of taking the information of objects from an existing dataset, passing it to an already trained translator, and applying the result to an existing image.
The idea is to erase the existing text from the image and put the translated text in the same place. So, to erase just the text from the existing image, we find the text area and fill it with the surrounding pixel information. Fundamental algorithm is based on morphological operations and contour filtering.1
1
2
3
4
5
6
7
8
9
10
11
12
13
14
15
16
17
18
19
20
21
22
23
24
25
26
27
28
29
30
31
import numpy as np

def inpaint_text_areas(image):
    gray = cv2.cvtColor(image, cv2.COLOR_BGR2GRAY)
    thresh = cv2.threshold(gray, 0, 255, cv2.THRESH_BINARY_INV + cv2.THRESH_OTSU)[1]

    close_kernel = cv2.getStructuringElement(cv2.MORPH_RECT, (15, 3))
    close = cv2.morphologyEx(thresh, cv2.MORPH_CLOSE, close_kernel, iterations=1)

    dilate_kernel = cv2.getStructuringElement(cv2.MORPH_RECT, (5, 3))
    dilate = cv2.dilate(close, dilate_kernel, iterations=1)

    cnts = cv2.findContours(dilate, cv2.RETR_EXTERNAL, cv2.CHAIN_APPROX_SIMPLE)
    cnts = cnts[0] if len(cnts) == 2 else cnts[1]

    mask = np.zeros(image.shape[:2], dtype=np.uint8)

    for c in cnts:
        area = cv2.contourArea(c)
        if area > 100 and area < 30000:
            x, y, w, h = cv2.boundingRect(c)
            cv2.rectangle(mask, (x, y), (x + w, y + h), 255, -1)

    inpainted_image = cv2.inpaint(image, mask, inpaintRadius=1, flags=cv2.INPAINT_TELEA)

    return inpainted_image

inpainted_img = inpaint_text_areas(img)
plt.axis('off')
plt.imshow(inpainted_img)
We utilized DeepL API to translate the original text into other language. Due to API usage limitations, it would be wasteful to translate every character (such as *, !, ^, @), so we only utilize translation function if the character contains Korean.
1
2
3
4
5
6
7
8
9
10
11
12
13
14
15
16
17
18
19
20
21
22
23
24
25
26
27
28
29
30
31
32
33
import re
import deepl
import getpass

def authenticate():
    auth_key = getpass.getpass("Enter API Key : ")
    translator = deepl.Translator(auth_key)
    return translator

def translate_text(translator, text, target_lang):
    result = translator.translate_text(text, target_lang=target_lang)
    return result.text

def check_korean(text):
    korean_pattern = re.compile(r'[\u3131-\u3163\uac00-\ud7a3]+')
    matches = re.findall(korean_pattern, text)
    if len(matches) < 1:
        return False
    return True


translator = authenticate()
translated_annotations = []
for ann in annotations:
    transcription = ann['attributes']['transcription']
    if check_korean(transcription):
        translated_text = translate_text(translator, transcription, 'JA') # JA : Japanese
        ann_copy = ann.copy()
        ann_copy['attributes']['transcription'] = translated_text
        translated_annotations.append(ann_copy)
    else:
        translated_annotations.append(ann)
Although we have done the translation task, the length of the sentences expressed in each language can vary, which can cross over boundaries. Therefore, we considered the following solutions.
- Resize the font : We resized the font to fit into the bounding boxes, but this resulted in text that was too small and generated data that was not suitable for training
- Pseudo Character Center (PCC) : We looked for a PCC to truncate appropriately, but the simple method resulted in too many characters being lost because different characters are represented at different lengths.
- PIL getbbox method : We utilized getbbox method in PIL library, which is a relatively new method supported by PIL. So we need to check the version.
1
2
3
4
5
6
7
8
9
10
11
12
13
14
from PIL import Image, ImageDraw, ImageFont

def add_new_text(image, bbox, text, font):
    x, y, w, h = bbox
    pil_image = Image.fromarray(cv2.cvtColor(image, cv2.COLOR_BGR2RGB))
    draw = ImageDraw.Draw(pil_image)

    text_pos_x = x
    text_pos_y = y + h // 2

    draw.text((text_pos_x, text_pos_y), text, fill=(0, 0, 0), font=font, anchor='lm')

    return cv2.cvtColor(np.array(pil_image), cv2.COLOR_RGB2BGR)
The generated image looks like as below:
Generation of translated receipt
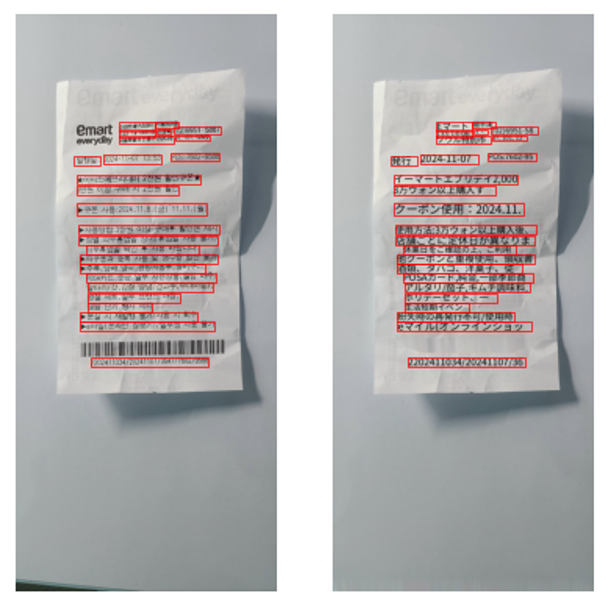
4. Re-labeling
To adjust the existing annotations, we used Computer Vision Annotation Tool (CVAT), which can be run on Web or Docker Engine. It has quite easy user interface, so we show the results. (If you have interests in using, please read my Korean blog)
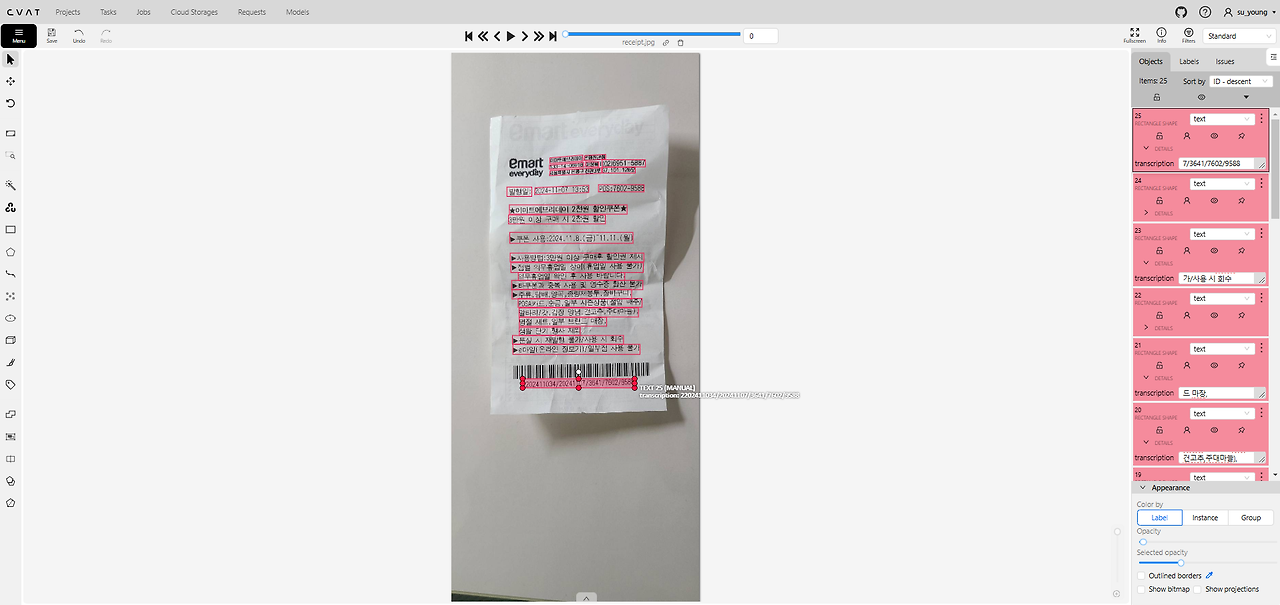
CVAT result
5. Conclusion
5.1. Lessons learned
In this project, we tried various data-centric approaches to increase quality and quantity of our dataset. Using the mentioned methods to make the dataset suitable for training, we were able to achieve better F1-score(0.9038), which is about 10.8% higher than the benchmark(0.8153).
5.2. Copyright and Code
This project is a part of a project held at boostcamp AI Tech, managed by NAVER Connect Foundation. The dataset used in the project is being under CC-BY-NC-ND License. It is available to check source code in GitHub Repository link.